Notice: Constant WP_DEBUG already defined in /home/arena-sayajigunj.com/public_html/wp-config.php on line 91 Blogroll Archives - Page 3 of 24 - Arena Sayajigunj
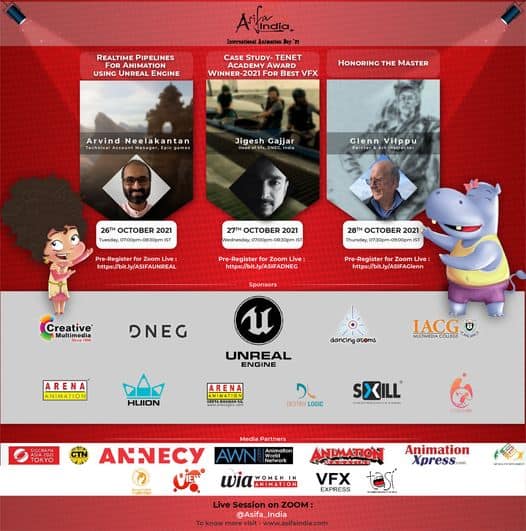
ASIFA India is Celebrating International Animation Day 2021 with three days of power-packed programs running over the 26th, 27th and 28th October. Legends of animation, games and VFX will give masterclasses on topics ranging from traditional art techniques to cutting edge technology, and there will be a case study of the Oscar winning film, Tenet. The events are free and all are welcome to join the online sessions and get inspired! Registration is open on the links below.
ASIFA India is spearheaded by “Vani” Saraswathi Balgam and led with heart by an amazing team of Sanjay Khimesara, Sesha Prasad, Ramakrishnan Vinod, Siva Kasetti , Ramakrishna Polina and Priyanka Ajit. ASIFA India is celebrating 22 years.
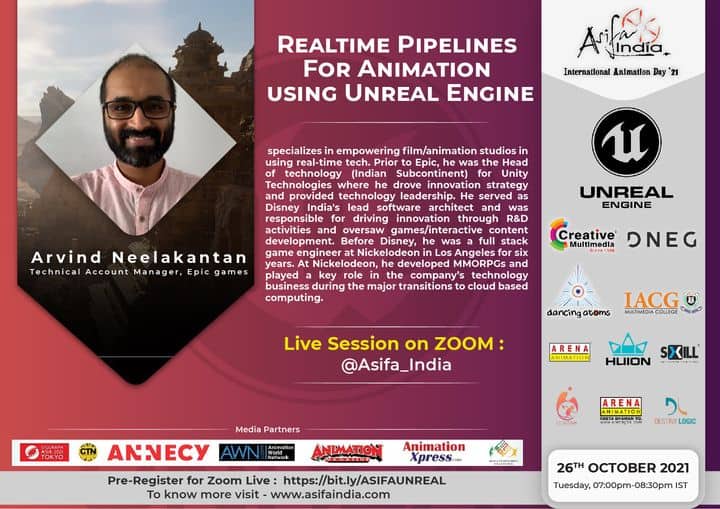
On 26th October unreal fellow and tech evangelist at Epic Games Arvind Neelakantan will open up the world of real time pipelines for animation using Unreal Engine. Arvind has been in the games and animation industry for 13 years with industry leading studios such as The Walt Disney Company, Nickelodeon and Unity. Arvind excels in making the technically complex accessible to artists. We can look forward to a fun session.
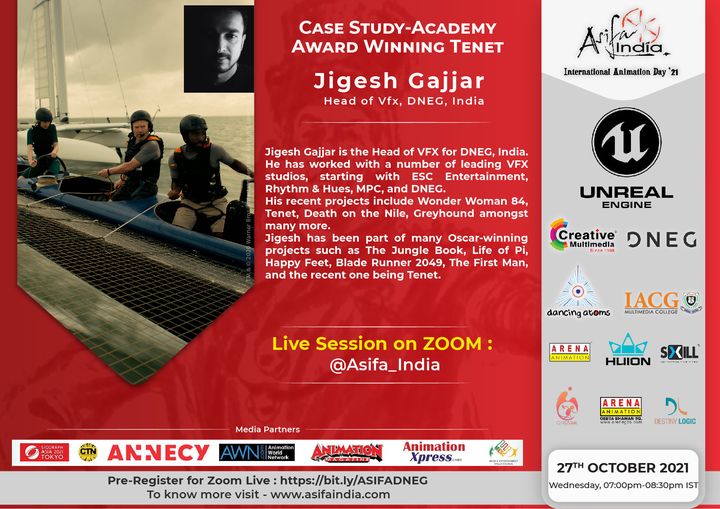
On 27th October Jigesh Gajjar, Head of VFX at DNEG India, will present a case study of the 2021 Oscar winning film for outstanding VFX, Tenet. Jigesh will go behind the scenes with a 40 minute in depth discussion about how DNEG pulled off the incredibly complex effects for Christopher Nolan’s ambitious film. In his career spanning 18 years Jigesh has worked on Oscar-winning films such as Life of Pi, Blade Runner 2049, and First Man.
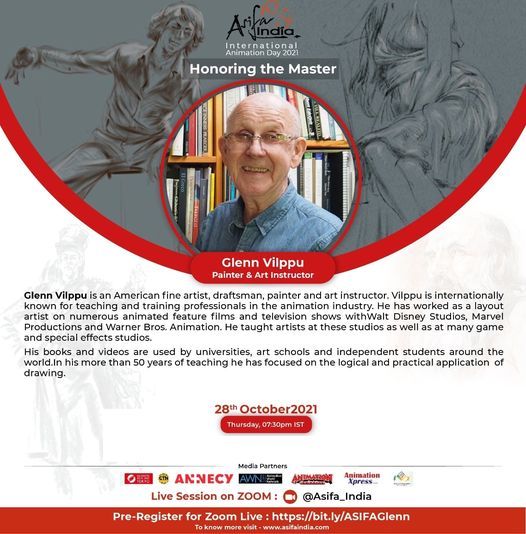
ASIFA India’s flagship event on 28th October, International Animation Day, will honor the foundations of art with a special program, for the first time in India, by legendary artist Glenn Vilppu. In the 90 minute session there will be the rare opportunity to witness Vilppu at work with a live demo. Glenn Vilppu is a master of drawing for classical animation and has trained artists at studios such as Disney and Marvel for over 50 years. Glenn’s numerous books and videos are used by universities and art schools around the world. The event will be followed by a raffle where a few lucky fans can win a book signed by Vilppu.
ASIFA International is the oldest organisation globally that supports animation and a commitment to the welfare of art, creativity and the artist.
The past year and a half has been challenging and events like this keeps us all connected and supports the growth of artists and advancements in art and technology in India. Our sponsors – Unreal Engine, Creative Multimedia, DNEG, IACG, Dancing Atoms and Arena Animation – are all committed to this positive momentum..
Additional support is provided by Huion, Citrus Studios, Sxills, Arena Geeta Bhawan (HID) and Destiny Logic. Media Partners for the event are Animation Express, AWN, Women in Animation, Animation Magazine, MESC, Annecy, View, TASI, and vfxexpress. Event partners are THU, Annecy, CTN, and Siggraph Asia.
Register:
Master class : Real-time pipelines for animation using Unreal Engine
Expert : Arvind Neelakantan, Technical Account Manager, Epic games
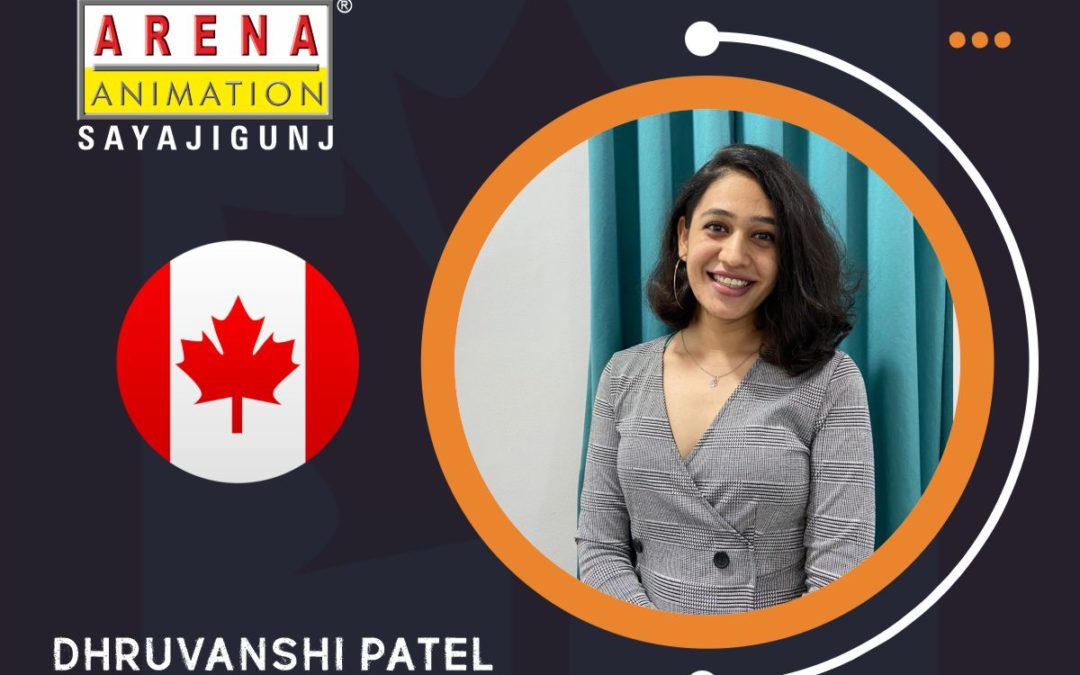
Actually, my experience was great at Arena Animation Sayajigunj! They helped me to get my VISA faster than expected.
Right from childhood, I had a profound interest in the field of arts. I made various sketches in different styles like Dot Painting, Charcoal Drawing, Pencil sketching, Watercolor, and Pastels. As I grew up, my interest in this field also matured. I got attracted more towards the art of visual effects in movies. The visual effects in Harry Potter and Avatar blew my mind when I saw the fictional characters and creativity portrayed in the surroundings. All these positive aspects made my interests inclined towards Visual effects.
After my higher secondary education, I decided to opt for the Visual Effects (VFX) stream. Eventually, I enrolled in the VFX program at Arena Animation Sayajigunj in October 2017.
After completing my first term study in December 2018, I got placed through Arena in January 2019 at Trace VFX Solutions India Pvt. Ltd., Mumbai To get hands-on experience and gain practical knowledge, I decided to complete my certification in the VFX program after getting some work experience.
During my 1.5 years at Trace, I worked on various Hollywood films and web series like Artemis Fowl, Cats, Snake eyes, Cursed, American Gods, etc., for MR.X, MILL Film, MPC Film & Episodic as a Jr. Matchmove/RotoAnim artist. I received credit on the silver screen for the Hollywood movie Artemis Fowl. My curiosity about learning VFX in detail increased as I learned more about it in my work life. After leaving my job in July 2020, I continued my VFX program at Arena Animation Sayajigunj and completed it in January 2021. My dedication led me to complete the program earlier by six months.
Now Having done my research, I was very clear about Canada as my chosen country for higher education. I prefer to study in Canada to gain multicultural exposure, high quality of education, latest study modules, and recognition of my degree back in India. Collaboration of Arena Animation & Vancouver Centre of Entertainment Arts – Langara College, Canada to help me a lot for my international career. and also I got A special scholarship of CAD 19,500 as I am an Arena Animation student. And It will be a lot to me. Once again Thank you Arena Animation.
Langara CEA is situated in Vancouver, a hub for Hollywood movies with plenty of studios located alongside the city. The faculty themselves have worked in many Hollywood movies, and what else can be better than getting trained under their supervision.
My main aim is to start up a studio in my hometown, and for that, I need supervision from the best college and experience in studios.
I recommend all students who are Ready to graduate from Canada – Visit Arena Animation Sayajigunj once which is best Vfx Training Institute in Vadodara.
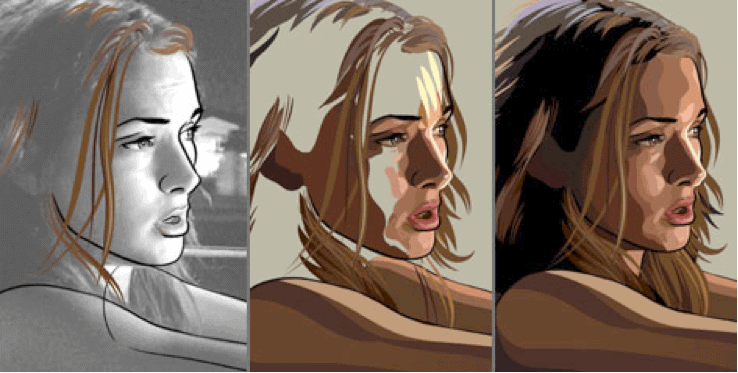
Rotoscoping is one of the oldest animation techniques that allows producing realistic footages. Traditionally, animators traced over motion picture footage, frame by frame. In the visual effects industry, the process, even though similar, has a different purpose.
Rotoscoping is mostly used today to create a matte or mask for an element, so that it can be extracted and placed on a different background. It may even be masked out to change colours or any other set of reasons. It is widely used than you may realize. Rotoscoping helps filmmakers create scenes that would otherwise be impossible, challenging, expensive, or dangerous to produce in real life.
Read on, to find out about the industries that employ trained, skilled and certified rotoscoping artists for various job roles.
VFX studios
In bigger VFX companies, rotoscoping artists are sometimes attached to a show along with a Compositor or 2D Lead to direct them on the projects. If not on one show, then their services are used on different shows that the company is in charge of. In smaller companies, the roto artists gain experience by being a Junior Compositor and doing their own roto and prep work along with the compositing work.
Film Production Houses
There are more things than you can imagine that goes into the making of a film. Rotoscoping artist are often required at film production houses. Something as simple as tracing hair on an actor’s head is done by them. Even with the availability of advanced digital technologies, the makers of Guardians of the Galaxy used traditional rotoscoping techniques by using footage of a real racoon called Oreo to bring ‘Rocket’ to life.
Animation Companies
It was the legendary filmmaker Max Fleischer who invented the technique of rotoscope back in 1914 when he animated Popeye The Sailor and Betty the Boop. A few years later, when Disney used the footage to get a sense of a character’s movement, instead of tracing over the live-action footage. Many animators have come up with their own style of rotoscoping through over the years. And is still being used to create a variety of animated assets.
Gaming Companies
Game developer Jordan Mechner of Smoking Car Productions invented digital rotoscoping while creating the adventure game The Last Express. He had even used rotoscoping in his previous game projects Karateka and Prince of Persia. Since then, the gaming industry has always been another important sector where rotoscoping artists can build a career in.
As Rotoscoping continues to be a vital process within the animated and live action film production pipeline, there is huge demand for skilled roto artists. By completing a Vfx Film Making career course and getting the right skills, you can get hired by some of the top companies in the above-mentioned industries.
Whether you are an aspiring VFX professional or a superhero movie enthusiast, you are here because you are impressed by the visual effects of the original MCU series, The Falcon and The Winter Soldier.
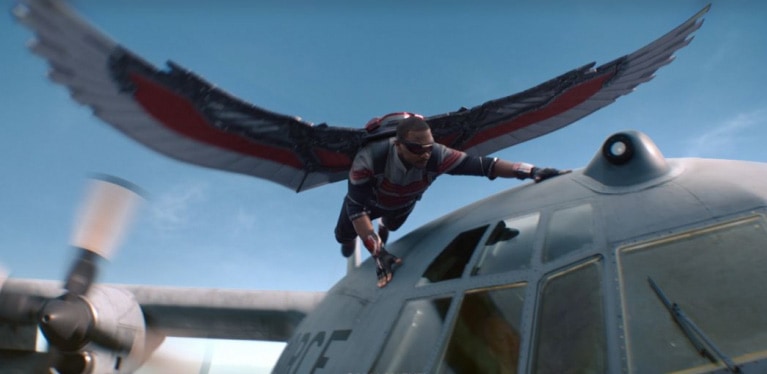
The MCU, for more than a decade has been carrying the Torch of legendary CGI epics. But lately they have been trying to shift your attention from heavily CG-ed wars to grounded and realistic TV series like The Falcon and The Winter Soldier. These shows have given us CGI scenes so perfect that none of us could have ever doubted it to not be real. From the aerial chase in the first episode and a few others that we would be exploring shortly. And who other than Weta Digital could have been trusted with such epic sequences amidst the global pandemic!
The show received a total of five award nominations including a nomination for a 2021 Primetime Emmy for Outstanding Special Visual Effects. The VFX team involved was supervised by Charlie Tait who alongside Eric Leven have been part of the Weta digital team for over two decades. You may not have heard his name but we are pretty sure that you would have enjoyed his work, which includes Avengers: Infinity War, Deadpool, Alita: Battle Angel, and Game Of Thrones Season 8. K
Meant for theaters, the production had a blockbuster budget with each of the six episodes reportedly costing $25 million and featuring a total of 2,500 visual effects shots.
Here are our top 3 favourite breakdowns of the VFX shots:
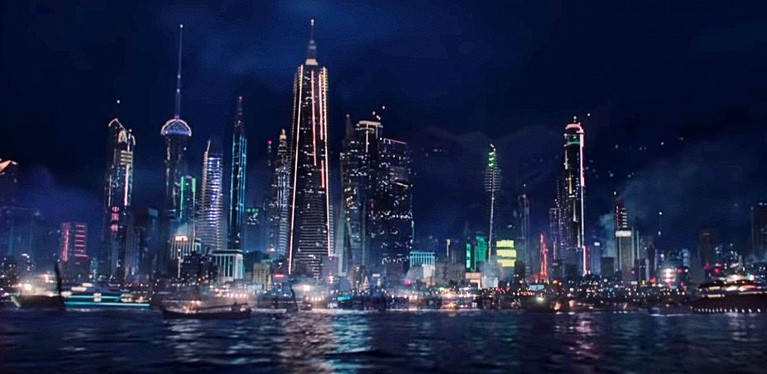
Madripoor
Establishing shots of Madripoor were entirely CGed with Hong Kong as the key reference for it. The uniquely shaped sky-scrapers and the dense slum was a mixture of on-set special effects and VFX. It’s amazing how they could show the stark contrast between the slum life and the riches all through CG, since Madipoor was essentially a pirate city.
Credits: (c)Weta Digital and (c)Marvel Studios
Canyon chase sequence
It was the first of the sequence to make us realise the brilliance of MCU’s execution of fight scenes. But what makes it unique from the ones we saw in the movies was the different visual language using the GoPro mount.
Credits: (c)Weta Digital and (c)Marvel Studios
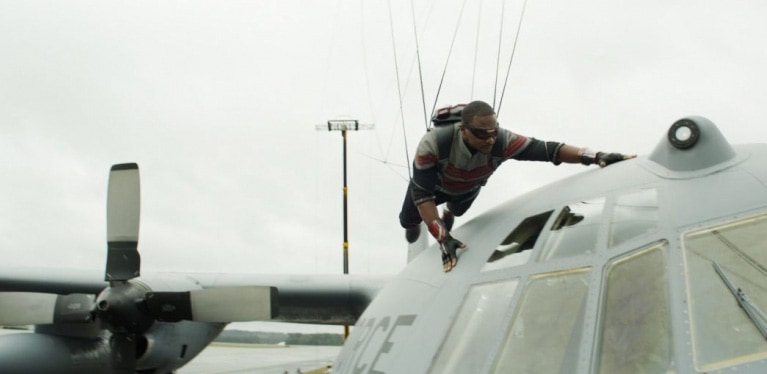
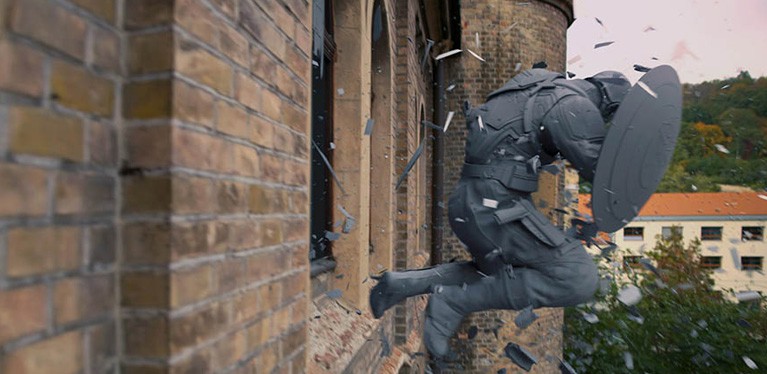
Digital double of Walker
The Walker you saw running and jumping through the window was a CG John Walker. A stunt double enacted the fall through the window on the car but the dents, exploding car windows, and the smashing through the house window was CGed. It might seem simple to create it but calculating the intensity of the smash is challenging.
Some scenes had digital doubles of both Anthony Mackie and Sebastian Stan. And since they have been in the MCU for a long time, they have become a few of the recognisable faces in the industry. Thus there wasn’t any room for the slightest of the mistakes in creating their CGs.
Credits: (c)Weta Digital and (c)Marvel Studios
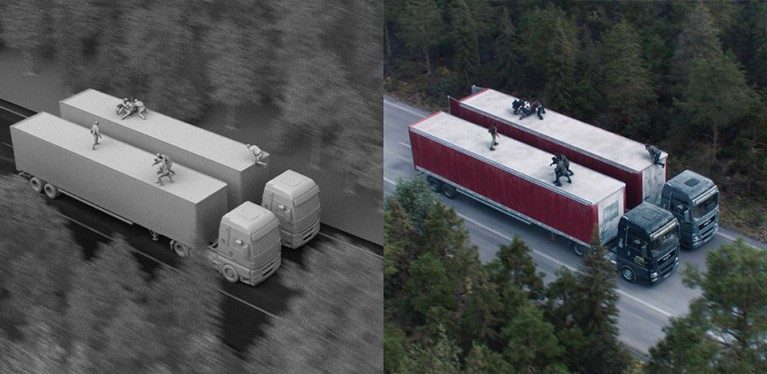
Truck battle
The trucks were absolutely stationary! The only thing moving was the CGI-Ed road. The road was moved at the required speed (120km/s) while adding bits of rocks, dirt and dust being kicked up subtly to enhance realism in the scene. In addition to that the sequence was shot in Atlanta (USA) and thus sign boards and surrounding environment was required to be transformed to that of Germany.
Credits: (c)Weta Digital and (c)Marvel Studios via beforesandafters.com
Marvel is stepping up the game for other superhero franchises like The Boys (Prime) and the DCEU. We believe there are much more surprises waiting for us in ‘Doctor Strange: Multiverse of Madness’.
Research shows that the average time spent by a consumer on a website is 45 seconds. Not minutes, but seconds! And with a million websites dwelling on the Internet, how would one make their visitors stay longer on their website? The answer is in web designing .
Understanding web designs is easy once you realise the needs of the website visitors and the vision of the brand. Sometimes it may seem overwhelming, especially when you are making changes to keep up with the latest trends, which is necessary, because traditional aesthetics go stale and boring in no time. But it is important that you translate the identity of the brand into your design. One of the best ways to achieve this is to choose images effectively for your website.
In this article, we will explore a crucial aspect of web designing that has stayed irrespective of the trend, i.e. images. Images trigger emotions, boost audience response, and increase engagement rates. Below are some image optimisation tips that every aspiring web designer should know.
1. Use the Right Image File Type
The common image file types are JPEG and PNG. PNG format is a lossless compression file format, which makes it a common choice for use on the web. But PNG is only a good choice for storing line drawings, text, and iconic graphics at a small file size. If your website intends to have photographs and realistic images then JPEG is your best bet. GIFs are acceptable for minimalistic animations.
2. Resize Images
Choose images in web-friendly sizes for the purpose of both beauty and function. Resize them to optimise page speed and appearance. This makes the website look balanced, and helps it to load faster. Image heavy websites take a long time to upload this resulting in higher bounce rates. According to Google, an image size less than 500kb is recommended. Compressing your images to 60-70% of original size is satisfactory. Use Compression plugins for this purpose.
3. Name Image Files & Add Alt Text
Website images improve SEO. Input the label for each image correctly and optimise its alternate text (Alt text) for SEO purposes. Do not waste the opportunity of boosting your SEO rankings with the right filename and Alt text. File names should be such that it gets readily accessed on google images. For example, instead of naming a file ‘Greenscreeneffect123.jpeg’, rename it to ‘before-and-after-green-screen.jpeg’. Use relevant titles and captions to describe the image.
4. Make it Social Media Friendly
Social media is a huge potential market for any business. To get the biggest social boost from your website images, make it easy for visitors to share your content by including buttons to instantly post to Facebook, Twitter, Pinterest and other social media sites.
For exclusive social media design tips, click here .
5. Create Attractive Website Banners
The purpose of a website banner is to create a focus point as they are the first thing noticed when a visitor enters the website. Hence, it is important to get the banner right as it only has mere seconds to capture the interest of a visitor and encourage them to stay on the website for further browsing. The only way this can happen is if the banner is attractive, unique and appealing to viewers. It has to convey the right message too. Its main purpose is to advertise your product or brand.
Implement these strategies before uploading image elements to a website. It will not only improve the website’s aesthetics, performance and SEO rankings, but also enhances the overall user experience.
Mastering these techniques will give you a head start in the web designing industry. To secure a career in the web & graphic designing, get the right skill sets with the help of a web & graphics course that suits your interests.
Animation Software that the Aspiring Animators Should Consider Learning
Is there a must-learn software that will help you create the highest quality animation? Of course there is more than one. But the real question is, which software you would be most comfortable with. There are many options out there, but given the time and energy being invested in learning a software, choose the one that will give you an edge over others. Achieve mastery in that tool.
For those who are considering working on animation software, the top four contenders are Autodesk Maya, Autodesk 3ds Max, Blender, and Houdini.
While the first two are advanced software used by professionals, Blender is free and perhaps the best choice for a beginner. Netflix’s ‘Next Gen’ was created in Blender and to quote the director Joe Ksander: “Artists, not tools, yo.”
If you wish to make a career in the animation industry, you may have to use the software that is being used in the studio you join. In such cases, knowing the fundamentals of one software can come handy as the workflow is almost the same across all. Flexibility can help you a long way. Below is a list of popular animation software, and why you should consider learning them.
Modeling, Animation, Rigging & Simulation
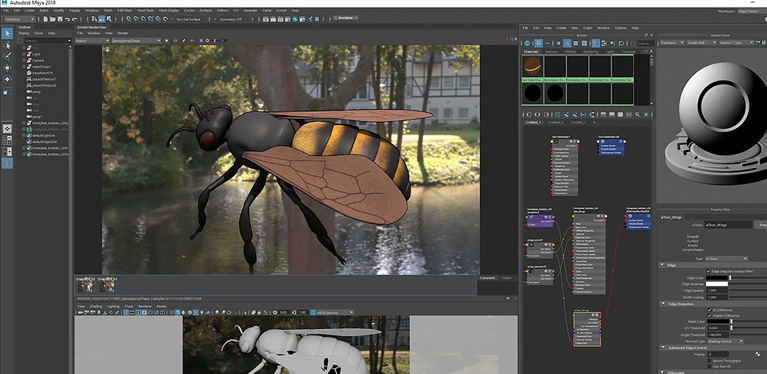
Autodesk Maya
Autodesk Maya is the most commonly used animation software! The latest versions have brought in huge improvements. While Maya is an ecosystem, its UI setups can be divided into Modeling, Rigging, Animation, FX, and Rendering. If you choose this software, you get access to plugins, scripts, learning materials, and tons of materials online as large and small studios across the world have been using this software for years now.
Contrary to the belief that Maya is hard, it isn’t. It takes a while to learn, but once you get the hang of it, you can work faster. Thorough knowledge of Maya could be your first step to a career in animation, game development or VFX.
Autodesk 3ds Max
It is an out-of-the-box software for poly modelling. It gives you a more direct and in-control feeling. As compared to Maya, 3ds Max is said to be more user-friendly. It is widely used in the creation of commercials and games than movies. A lot of indie studios are opting for 3ds Max rather than Maya.
Houdini
Houdini comes into the picture if budget is a concern. Maya is expensive than Houdini. However Houdini has an edge over Maya for dynamic simulations and time efficiency. It has been used for movies like Pacific Rim and the Harry Potter series.
Blender
It is an open source software. If you are a beginner, Blender is a good place to start. It supports asll aspects of the 3D pipeline including modeling, rigging, animation, simulation, rendering, compositing, and video editing.
Compositing
Nuke is the industrial standard for compositing. It is versatile, customisable, and user friendly. It comes with hundreds of creative nodes including rotoscope and vector paint tools that allow you to master digital compositing. The deep image compositing tools help you to work with images of various opacity, colour and camera-relative depth. The machine learning tools save your time, especially when creating sequence-specific effects. You will not need to explore others if you master this node-based software.
Rendering
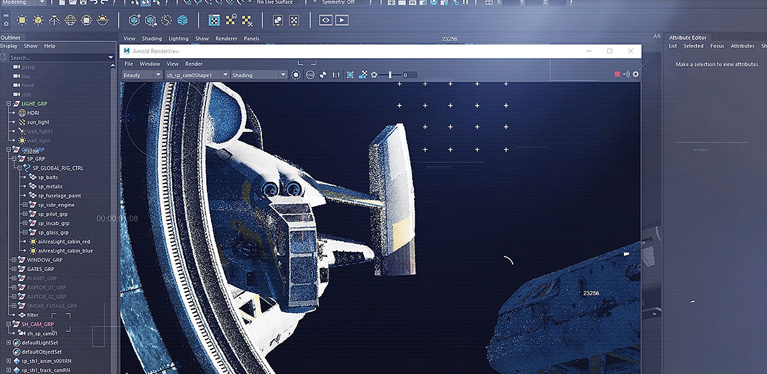
Arnold is an advanced renderer and is used for feature-length animation and visual effects. It is capable of great photorealistic renders. Arnold’s plug-ins are available for Maya, 3ds Max and Houdini.
If you are looking for a single solution when it comes to animation software, the best consideration would be Autodesk Maya as most studios are interested in hiring professionals with expertise in this software. Once you know Maya, you can adapt to any program within a short period of time.