Adobe Photoshop software is used in a graphics editing program created by Adobe for Windows and Mac OS. Photoshop is a raster-based image editor which has the capability of composing and editing raster images in multiple layers and supports features such as masking, fluid camera rotation, Image wrapping tools, Alpha compositing and much more advanced features and tools.
The Latest Photoshop CC version which is a part of the Adobe Creative cloud branding. Photoshop and other software related to it is collectively branded as The Adobe Photoshop Family. This Family consists of Photoshop Elements, Photoshop Express, Photoshop Lightroom, Photoshop Fix and other.
Click on below video: Basics of Adobe Photoshop CC 2019
Adobe Photoshop is not only software but it a powerhouse of composing, editing, drafting, artworks and sketching images. Let’s get started with photoshop components, advantages and disadvantages and its Characteristics.
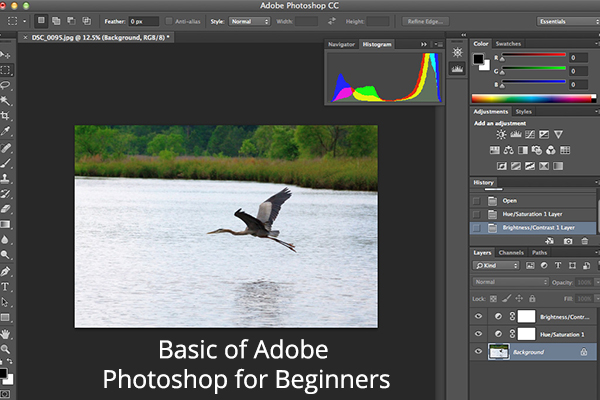
Components of Adobe Photoshop
There are some main components of Photoshop that one need. Below are those components:
1. Menu Bar: This option consists of various commands used to edit and compose images in the Photoshop software. Edit, file, layer, select, view, windows and help are the basic commands.
2. Options Bar: This bar shows several options for specific tools in the tool palette. When the user chooses a tool in the tool palette, the options bar showcases various preference for the particular tool.
3. Tools Palette: This palette is a collection of icons that are used for creating and editing images and page elements.
4. Document Window: It represents the current status of the file in which the user is working. Those windows can be docked and grouped as per the requirement of the designer.
5. Layer Panel: This panel helps the user to stack different things on the artboard on different layers to set them organized and make editing fast and easy.
Advantage & Disadvantage of Adobe Photoshop
Advantage:
Video editing is smooth.
The crop tool is quite useful.
Performance is highly improved.
Disadvantage:
No perpetual license.
The interface is crushing.
Some tools lack progress in bar visibility.
Click on below Video: Advantages & Disadvantages of Adobe Photoshop
Characteristics of Adobe Photoshop
1. Brushes
The upgraded brushes in the software offer the users to create clearer lines and smoother brush strokes. When the users work with the pencil, brush tools or mixers brush they get the benefits of controlling the brushes smoothing. You can enter the value from 0 to 100 for the smoothing of brushes.
2. Adjustment Layers
These layers are another form of non-destructive editing with Adobe Photoshop. With layers, the editing applies not on the actual layer, but it builds a new adjustment layer right above the pixel layer. This feature works in favour of the designer as and the designer can change the blend mode or apply filters, change the opacity or get rid of this layer anytime he feels so.
3. Camera Shake Reduction
This feature works excellent for editors and especially for photographers. When the person is working with some shaken or blurry images, it analyses the graph and restores the image sharpness.
4. Content-Aware Move
This feature works miracles for editors in this software. It lets the user select an object in the same layer image and move it away as per their choice in the same picture. Besides, Photoshop does its work amazingly by filling the gap made by moving the object.
5. Smart Object
These smart objects are non-destructive. The editor can edit and create multiple copies of the object which are interlinked with each other. It is a pixel independent and allows the user to scale it without getting blurry. The user can able to use various filters and edit them whenever required. Moreover, any normal layer can be easily converted to a smart object layer by right clicking on any layer.
Click on below Video: Adobe Photoshop Tutorial : The Basics for Beginners
Arena Sayajigunj offers an excellent opportunity for students who are interested to learn more on Adobe Photoshop on a more professional level, please sign up today for our Arena Sayajigunj Courses.
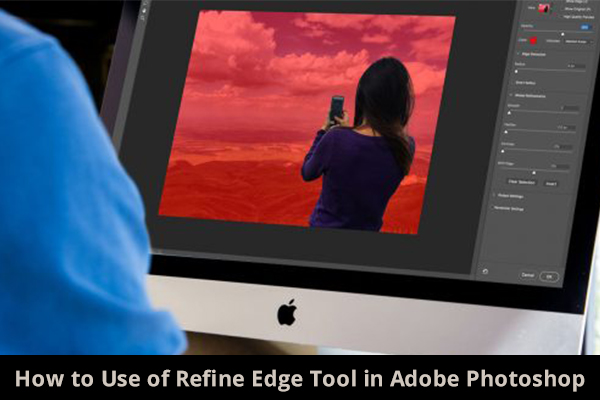
The Refine Edge Tool in Adobe Photoshop is a powerful feature that lets you fine-tune selections, a task helpful when dealing with complex edges. This Refine Edge tool is available in the menu bar and the right-click context menu of the Photoshop. There are various controls in the refine edge tools like Adjust Edge and Edge Detection make creating natural selection task a lot easier rather than doing manually. In this Arena Sayajigunj Blog post we are going to teach you how to use Refine Edges Tool in Adobe Photoshop.
5 Step to Use of Refine Edge Tool in Adobe Photoshop
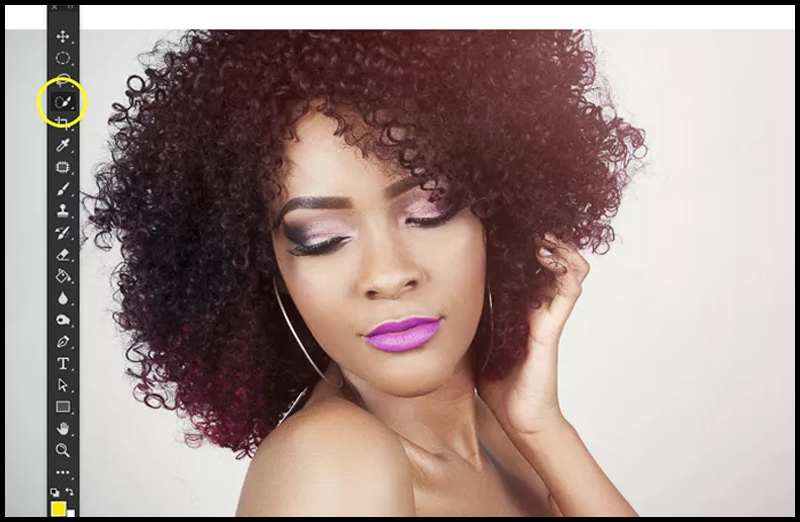
Step 1: Make a Selection
Start with creating a selection of your subject.
Make use of any selection tool which is available.
Here we will make use of quick selection tool.
The selection of the subject doesn’t have to be perfect but not to leave out the large part when making the selection.
Step 2: Open Refine Edge
Hold the Shift key then go to select in the menu bar and click on ‘Select and Mask’
The Refine Edge window will pop up.
Click on below Video: How to Use the Refine Edge Tool in Photoshop
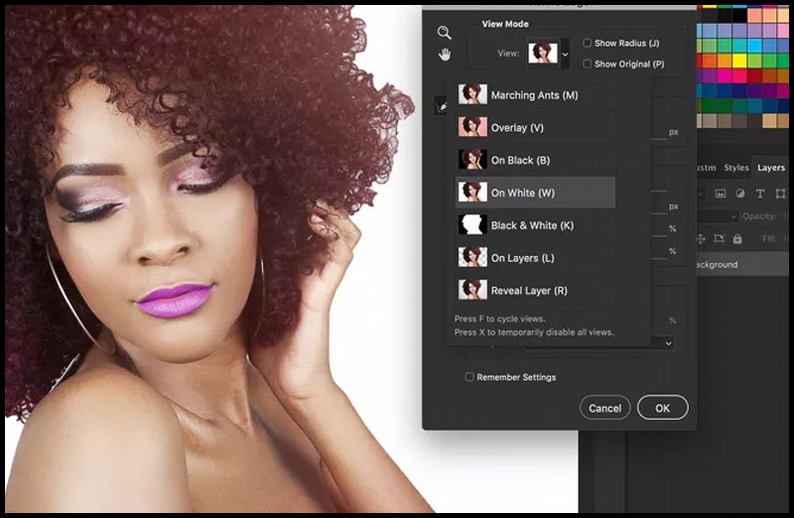
Step 3: Select a View Mode
Depending on the colors of the photo you are using select a view mode of refine edge.
In this example the while background is perfect to see the selection and what we are doing.
Make use of different modes to learn which work best for selection you want to make.
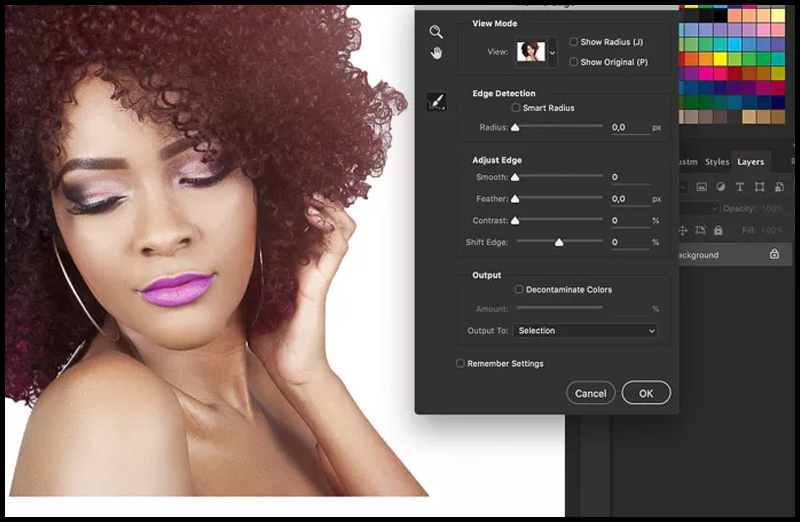
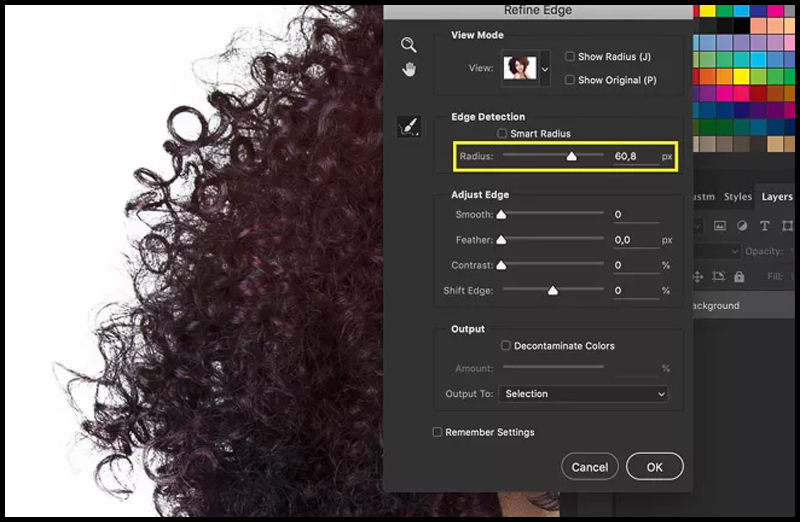
Step 4: Adjust the Edges
The selection in this example is ok but far from perfect one. Still, grey areas in the hair and edges are rough. Adjusting the edges will set this.
Start with radius this is the setting you use the most when refining edges in Photoshop.
Increase the slider value to make the edges of the selection softer and natural.
For the most part, the radius defines what the result will look like.
Make use of 4 other sliders in the Refine Edge Window to get and most natural result:
1. Smooth Slider: The Smooth slider smooth out the edges. Keep it low because it takes away from selection. In this example: Here we use this slider to smoothen the edges of the hair.
2. Feather Slider: The Feather slider use to blend the selection more into its eventual background.
3. Contrast Slider: The Contrast slider adds more definition to edge. Using much will create harsh edges.
4. Shift Edge: Move the Shift Edge left or right to shrink or expand the selection.
Step 5: Output the Selection
Check decontaminates colors to remove color fringe before your output. It could be necessary when your subject is against a contrasting color background.
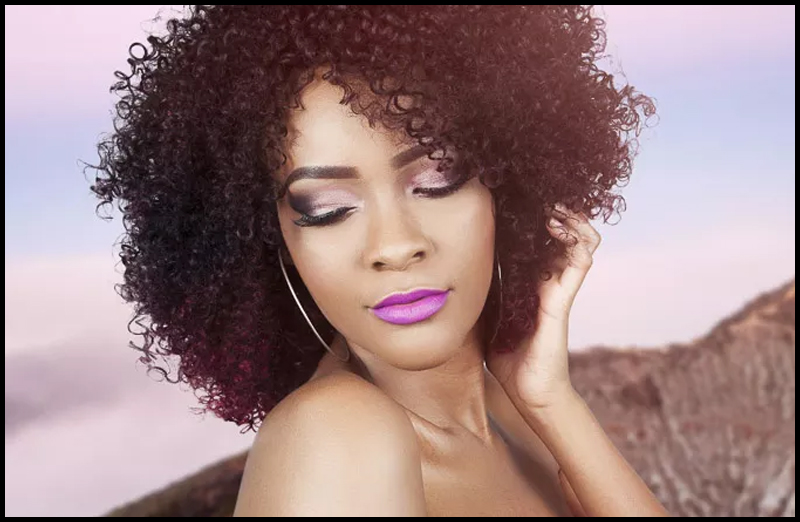
To finalise the selections select one of the output options. Usually, New Layer with Layer Mask is the best option. It allows editing the selection even further without losing the original quality of the photo.
There is no better way to select hair than using the Refine Edge tool in Adobe Photoshop.
Do practice a lot with the subject on different backgrounds. The Background effects how difficult making the selection will be.
Begin with uniform backgrounds and then move on to the colorful ones.
For students who are interested to learn more on Adobe Photoshop tools and would like to learn this on a more professional level, please sign up today for our Arena Sayajigunj Course.
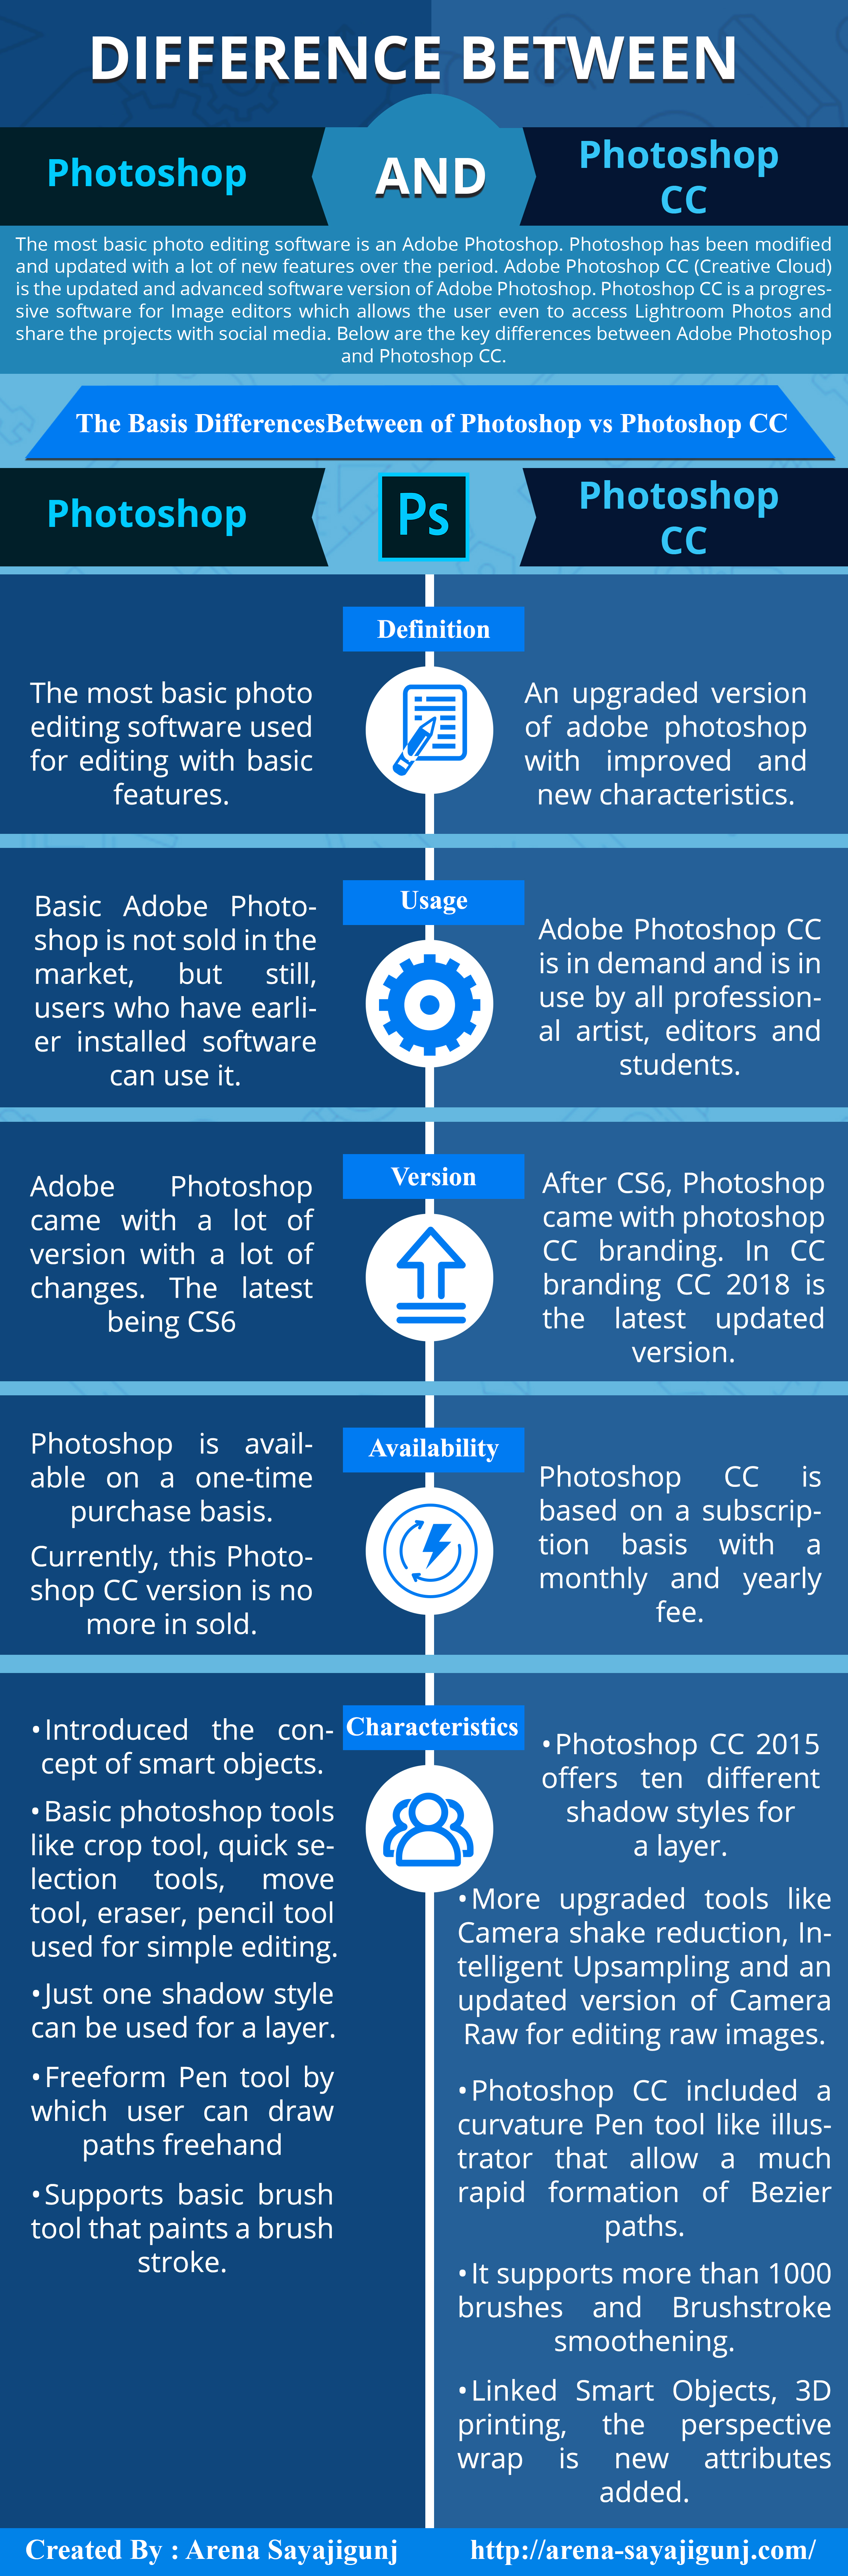
The most basic photo editing software is an Adobe Photoshop. Photoshop has been modified and updated with a lot of new features over the period. Adobe Photoshop CC (Creative Cloud) is the updated and advanced software version of Adobe Photoshop. Photoshop CC is progressive software for Image editors which allow the user even to access Light room Photos and share the projects with social media. Below are the key differences between Adobe Photoshop and Photoshop CC.
Differences Between of Photoshop vs Photoshop CC
Photoshop
Photoshop CC
The most basic photo editing software used for editing with basic features.
Definition
An upgraded version of adobe Photoshop with improved and new characteristics.
Basic Adobe Photoshop is not sold in the market, but still, users who have earlier installed software can use it.
Usage
Adobe Photoshop CC is in demand and is in use by all professional artist, editors and students.
Adobe Photoshop came with a lot of version with a lot of changes. The latest being CS6
Version
After CS6, Photoshop came with Photoshop CC branding. In CC branding CC 2018 is the latest updated version.
Introduced the concept of smart objects.
Basic Photoshop tools like crop tool, quick selection tools, move tool, eraser, and pencil tool used for simple editing.
Just one shadow style can be used for a layer.
Freeform Pen tool by which user can draw paths freehand
Supports basic brush tool that paints a brush stroke.
Characteristics
Photoshop CC 2015 offers ten different shadow styles for a layer.
More upgraded tools like Camera shake reduction, Intelligent Up sampling and an updated version of Camera Raw for editing raw images.
Photoshop CC included a curvature Pen tool like illustrator that allows a much rapid formation of Bezier paths.
It supports more than 1000 brushes and Brushstroke smoothening.
Linked Smart Objects, 3D printing, the perspective wrap is new attributes added.
Photoshop is available on a one-time purchase basis. Currently, this Photoshop CC version is no more in sold.
Availability
Photoshop CC is based on a subscription basis with a monthly and yearly fee.
Arena-Sayajigunj offers an excellent opportunity for students who are interested to learn more on Difference between Adobe Photoshop and Photoshop CC on a more professional level, please sign up today for our Animation Courses.
There are many basic principles of design that beginning and professional designers alike should keep in mind when working on any projects. Also, there are another dozen or so “secondary” design principles that are sometimes included as basics (for example typography and framing). The basic principles of design are explained and illustrated in the below section.
Click on below Video: Principles of Graphic Design
6 Basic Principles of Design for Graphics
The design differs from art in that it has to have a purpose. Visually, this functionality is interpreted by making sure an image has a centre of attention, a point of focus. The principles of design are the designer rule that must follow to create an effective composition.
A graphic design like any discipline adheres to strict rules that work beneath the surface to make the work balanced and stable. If the work is missing that balance, it will be weak and ineffective.
1. Balance
Balance helps to give design its form and stability and to distribute the elements throughout your design and this even spacing will offer an appearance that is attractive instead of being messy. Balance doesn’t mean elements need to be of the same size or that they must be distributed across the page — it can be symmetrical or asymmetrical.
Symmetrical balance weights the elements even on either side of the design.
Asymmetrical uses contrast to even out the design flow.
2. Contrast
Contrast is an essential principles of design because it lets you draw out the most important design elements and add emphasis. It happens when two design elements are in opposition to each other like white and black, modern and traditional etc. Contrast guide the viewer’s eyes to the most important parts of a design and helps organize the information in an easily absorbable way.
3. Color
Color is a significant part of the design and considered it carefully each time when you start a new design. Colors are mainly responsible for dictating the design mood. Green tends to make people think of non-profits, while red causes dark emotions like blue are more calming and passive and yellow create a sensation of happiness. To aid legibility, consider adding a gradient background behind the text, especially if your text color is at all the same. It will help make your words pop.
Click on below Video: Beginning Graphic Design: Color
4. Space
The parts of design you choose to leave blank is as important as the one you are filling with text, colors and images. Negative space creates shape and helps to highlight the most important pieces of information in design.
5. Repetition
Repetition is an important basic principles of design because it helps to strengthen the overall look of the design. It ties together different elements to help to remain organized and consistent. Repetition and consistency are used in branding because you want your particular look to be instantly recognizable.
6. Proportion
Proportion is the visual size and weight of elements in a composition and how they are related to each other. It helps to approach your design in sections, instead of as a whole.
Grouping related items can give them importance at a smaller size – think of a box at the bottom of your poster for ticket information or a sidebar on a website for a search bar. Proportion can be achieved when all design element is well-sized and thoughtfully placed. Once you master color, balance and contrast, the proportion should emerge organically.
Click on below Video: Graphic Design Tutorial for Beginners
For students who are interested to learn more onbasic of principle of design in vadodara and would like to experience and practice on a more professional level, please sign up today for our Arena SayajigunjGraphics, Web Design & Development (GWDD) program.
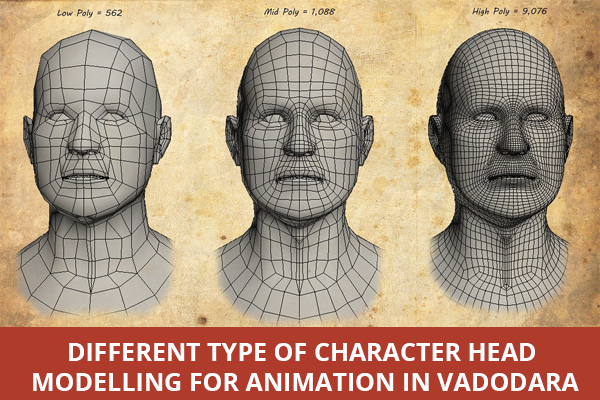
If you are a beginner and want to learn in-depth about head modelling animation, then you visited at the right place. This Arena Sayajigunj blog is specially designed for you here you will be going to learn about different types of character head modelling animation and all other things that you should put in your mind while working to create a realistic character head modelling. Creating believable character modelling has been one of the ultimate goals of many 3D artists. So let get started with one-by-one type of head modelling for animation in detail.
Click on below Video: Head Modelling for Animation
Different Type of Character Head Modelling for Animation for Beginners
1. Pre-Modelling
In the first step of process select a good quality reference photograph because in bad quality reference photographs you may face many problems in the modelling process.
There can be a possibility that your model perfectly looks in orthographic view, but in perspective view, it doesn’t look like a character in reference.
It is essential to take the reference photo of a character at the right angle or else you will waste your time in adjusting the mesh to make it look perfect.
You have to take care of your camera’s focal length, the longer the focal length is, the more superior reference photographs you get.
The model gets thicker than the reference, but you can always set it in the perspective view.
Before importing the reference photograph in a 3D application, you have to make sure that your image fit with each other.
If you need correct reference images in Photoshop or any other image editing software, next, you should take care of lighting so that you can avoid losing details.
2. Edge Planning and Topology
Planning the topology before modelling is essential or else you will get lost in the maze of edge loops or lost control of the poly-count and end up wasting poly on unnecessary parts.
First sketch the main shape of the head part then the base part. In 3D modelling, a good flow of topology is one of the key elements, especially in head modelling and human face.
Due to poor topology and skinning, the polygonal shape can turn to be bad.
With a messed up topology, the head model cannot do a single facial animation and even if it can the expression will look un-natural and distorted badly or it requires a lot of skinning/deform rigging work.
During the animation, the head modelling has more screen time with many close-up shots that involve complex animation facial expression like smile, anger, sad etc. all bring up a different type of shapes and deformations stages of the face.
A good topology creates a decent result with less poly count and smart topology helps in head modelling to be able to deform well into to any realistic expression.
The shape of the head, wrinkles and expressions that are produced by muscles and the shape of the skull and muscles that are produced by the ‘smile lines’. An artist should study the movement and shape of the outside skin, not the muscle. So the topology should be on the major wrinkles which are formed by facial muscles.
Character head modelling starts with the most identical wrinkles then building up intersected edge flows from that. As most of the human face are about 99% similar to each other in anatomy, so the topology would not change dramatically.
3. Modelling Rules
Keep Poly-count low. Make use of four sides as much as possible and use triangle when it is needed, triangles help to save unnecessary edge loop and faces.
Stay away from using more than four sides or poles. You may use poles in an area that is less seen in the model.
The Polygon should always be in square shape, no long thin nor diamond shaped.
The extreme bad case on topology is working at 45 degrees and the edge direction should not work across the curvature line of surfaces.
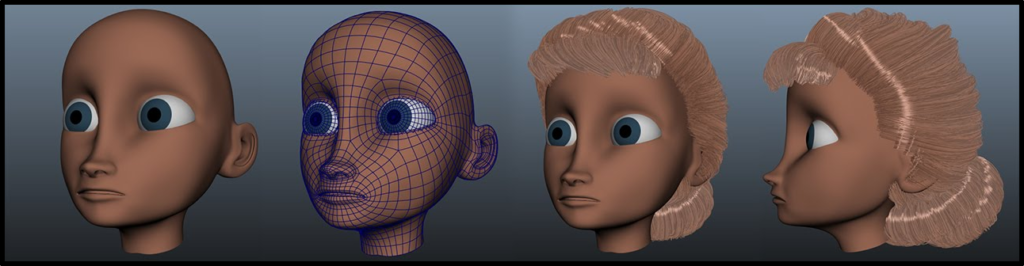
4. Polygon Modelling
It is the basic and straight forward modelling process.
Start creating a character face from shapes like sphere, cube or plane. First, cover out the overall shape of the head and delete unnecessary face and edge loop to make a basic topology and then work into fine detail by joining more edge and face around the area like nose, eye, mouth, ear etc.
Polygon modelling allows you to have direct control over faces, edges and vertices. It requires a lot of editing work and sometimes does not work efficiently with surfaces that need high accuracy. Some of the artists prefer to draw curves that run along the prominent lines of the reference images and then edit the lines to form a head shape.
Then eject around the lines and start forming separated parts of the face and then connect it together, continue adjusting the object until you get a completed face form.
5. Sub-D Modelling
This method is similar to Polygon Modelling.
After having the necessary head model, now you can go into detail by sub-dividing one more level to have more vertex for editing.
This method helps you to adjust the overall shape of the object by editing at the lowest level of the mesh or object.
6. ZBrush/Mudbox Sculpting Software
This Software can be used for model character head modelling, beginning from a zsphere or any head model and then continue with details.
After the detailing, retopology tool can be used in Zbrush or resurface it with the new topology in 3Ds Max software to create a lower poly count model but still keeping the similar look of high resolution model.
The advantage of this method is that you can detail the head model up to millions of polygon and the job of modelling and topology is separated.
To create a 3D realistic face, you need to work on a successful model face from the start.
Click on below Video: Introduction to Character Modeling in Blender
Hope you enjoy the ideas and to learn more about character head modelling in Vadodara and would like to experience and practice on a more professional level, please sign up today for our Arena SayajigunjAnimation Courses.